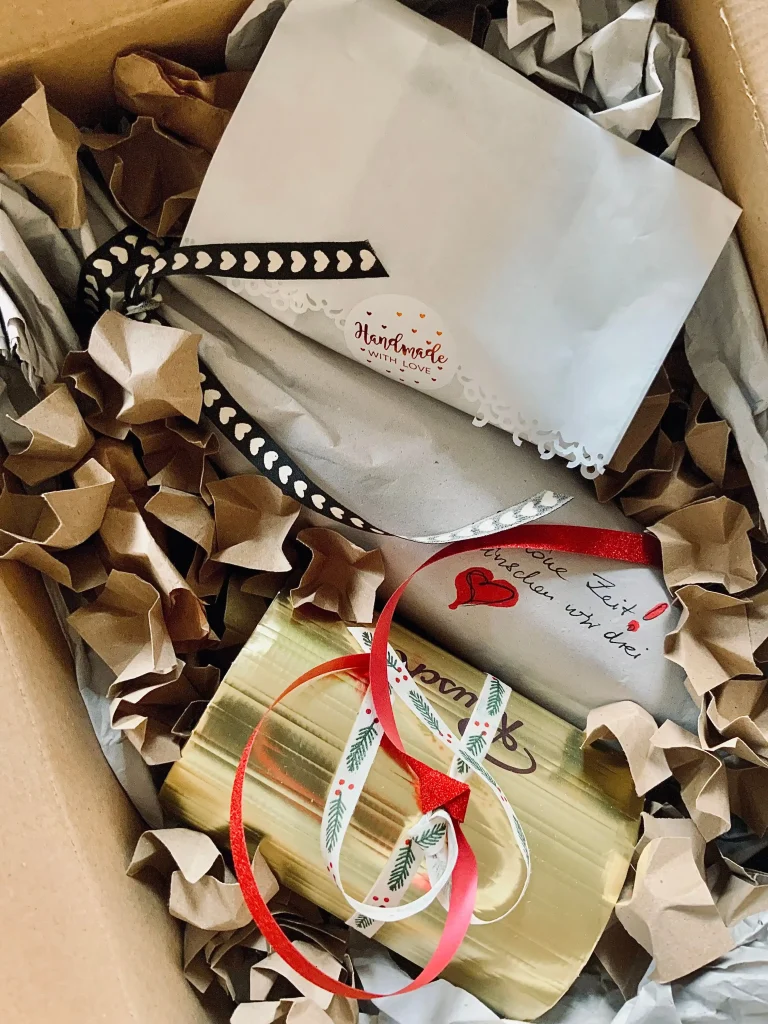

A beautifully wrapped gift can make an ordinary present feel thoughtful, personal, and exciting before the recipient even opens it. While store-bought gift bags and professional wrapping services are convenient, creating your own gift packaging at home can be just as beautiful and often more meaningful. With a few simple materials, a little creativity, and some inspiration, you can transform everyday paper, ribbons, fabric, and decorative accessories into something special.
The best DIY gift-wrapping ideas do not require expensive supplies or advanced crafting skills. Whether you are preparing a birthday surprise, a holiday present, a thank-you gift, or a thoughtful treat for someone you love, simple details can make a big difference. From handmade bows and personalized gift tags to reusable fabric wrapping and decorated boxes, there are plenty of ways to make your presents stand out.
If you enjoy adding a personal touch to the gifts you give, these 15 easy DIY gift-wrapping ideas will help you create beautiful packages at home without spending too much.
1. Create Elegant Gift Wrapping With Kraft Paper and Ribbon
Kraft paper is one of the easiest materials to use for DIY gift wrapping. Its natural brown color creates a simple, rustic appearance that works for birthdays, holidays, weddings, and almost any special occasion. Instead of purchasing expensive printed wrapping paper, use a roll of kraft paper to cover your gift and decorate it with a ribbon that matches the occasion.
For a more polished finish, choose satin, velvet, or cotton ribbon in a contrasting color. A cream ribbon creates a soft and elegant look, while burgundy, forest green, or gold can make the package feel more festive. You can also attach a small handwritten gift tag to complete the presentation.
This idea is especially useful when wrapping several presents because kraft paper is versatile and easy to coordinate with different decorations.
2. Make Your Own Handmade Paper Bows
A handmade paper bow is a simple decoration that can make even the most basic gift packaging look more creative. Instead of purchasing ready-made bows, use leftover wrapping paper, scrapbook paper, or colored cardstock to create your own.
Cut several strips of paper in different lengths, fold them into loops, and secure the ends with glue or double-sided tape. Arrange the loops into a flower-like shape, then add a small paper circle or strip in the center to hide the joins. Attach the finished bow to the top of your wrapped gift.
You can customize the bow by choosing patterns and colors that complement the wrapping paper. Metallic paper creates a glamorous finish, while pastel shades are lovely for birthdays and baby showers. Handmade bows are also a great way to use leftover craft supplies rather than throwing them away.
3. Wrap Gifts With Fabric for a Reusable Finish
Fabric wrapping is a beautiful alternative to traditional gift paper, especially when you want packaging that can be reused. You can use scarves, cotton fabric, linen, or other soft materials to cover your gift. This approach creates a unique presentation while reducing the amount of disposable wrapping material.
Place your gift in the center of a square piece of fabric, bring the opposite corners together, and tie them into a knot. Adjust the fabric until the package looks neat, then arrange the remaining corners into a decorative bow.
A colorful scarf can also become part of the present itself, making this idea particularly thoughtful. Choose a fabric that suits the recipient’s taste, and the wrapping becomes an additional gift rather than something that will immediately be discarded.
4. Decorate Gifts With Dried Flowers
Dried flowers can give DIY gift wrapping a delicate and elegant appearance. They are especially beautiful when paired with neutral wrapping paper, kraft paper, or simple white packaging.
Start by wrapping your gift in your preferred paper. Tie a piece of twine or ribbon around the package, then carefully tuck a small bundle of dried flowers underneath the knot. Lavender, baby’s breath, and other small dried stems can create a soft decorative effect.
You can also use dried leaves, preserved greenery, or small decorative branches. The key is to keep the arrangement balanced so that the flowers complement the package without making it difficult to handle.
This idea works beautifully for birthdays, anniversaries, bridal showers, and gifts for people who appreciate natural decorations.
5. Turn Plain Paper Into Personalized Wrapping Paper
If you cannot find wrapping paper in the right design, make your own. Plain white paper, kraft paper, or large sheets of drawing paper can become personalized gift wrap with just a few inexpensive materials.
Use stamps, markers, paint, or stencils to create patterns across the paper. You could draw small hearts, stars, flowers, geometric shapes, or the recipient’s initials. For a birthday gift, consider adding the person’s name or a design inspired by their favorite colors.
Handmade wrapping paper is a wonderful way to make a present feel personal. It is also a fun project to complete with children, who can create their own patterns and drawings for family members.
Allow paint or ink to dry completely before wrapping your gift to prevent smudges and unwanted marks.
6. Use Recycled Newspaper and Magazine Pages
Old newspapers and magazine pages can become attractive DIY gift-wrapping materials when used creatively. This is a practical way to reuse paper that might otherwise be thrown away, and it can give your presents an interesting, vintage-inspired appearance.
Choose pages with attractive photographs, fashion editorials, colorful illustrations, or interesting typography. Wrap your gift carefully, then finish it with a ribbon or twine. You can also add a small handmade tag to make the package look more complete.
For a more coordinated appearance, select pages that share similar colors or themes. Magazine pages featuring fashion, travel, or art can be especially attractive for gifts intended for someone who enjoys those subjects.
Because recycled paper can be thinner than traditional wrapping paper, consider using two layers for extra strength.
7. Create Personalized Gift Tags at Home
A personalized gift tag is a small detail that can make a present feel much more meaningful. Rather than purchasing ready-made tags, create your own using cardstock, leftover wrapping paper, or recycled cardboard.
Cut the material into small rectangles, circles, or other shapes. Write the recipient’s name and a short personal message using a marker or calligraphy pen. You can decorate the edges with small drawings, stickers, or paper cutouts.
For a more polished finish, punch a small hole near the top and attach the tag with ribbon or twine. You can even match the tag to the wrapping paper to create a coordinated design.
Personalized gift tags are particularly useful when preparing several presents for a party or family celebration because they help identify each gift while adding a thoughtful finishing touch.
8. Make a Beautiful Gift Package Using a Mason Jar
Not every present needs to be wrapped in traditional paper. A mason jar can become a charming gift container for small treats, beauty accessories, handmade items, or carefully arranged gift sets.
Start by cleaning and drying the jar thoroughly. Arrange the items inside so they are visible and neatly presented. Add tissue paper or shredded paper filler if needed to keep the contents in place. Once everything is arranged, close the lid and decorate it with a fabric circle, ribbon, or personalized tag.
This idea is particularly useful for small gifts that are difficult to wrap individually. It also works well for homemade treats, bath accessories, and little collections of thoughtful items.
Choose a jar large enough to hold the gift comfortably, and make sure the lid closes securely before decorating it.
9. Transform a Simple Gift Box With Tissue Paper and Ribbon
Gift boxes are among the easiest packaging options because they provide a neat shape that is simple to decorate. Even a plain cardboard box can look elegant with the right combination of tissue paper, ribbon, and small accessories.
Place your gift inside the box and add tissue paper around it to create a soft, finished appearance. Fold the tissue paper gently over the contents, then close the lid. Wrap a ribbon around the outside and finish with a bow on top.
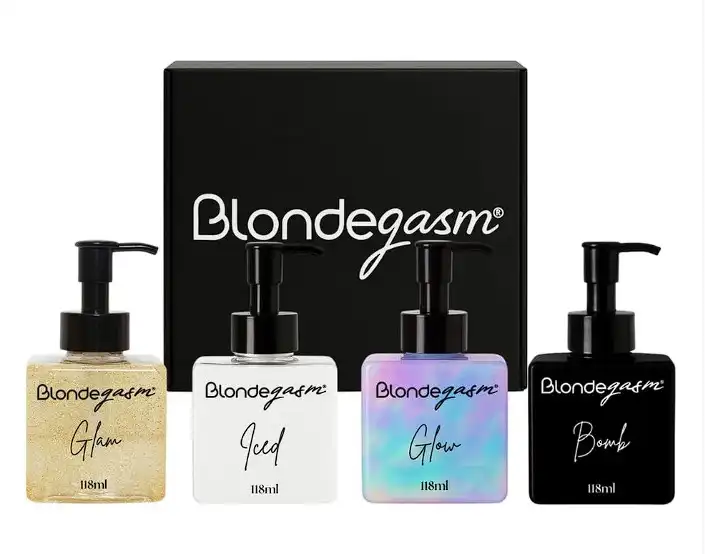
For a beauty gift, a boxed product set is especially convenient because its packaging already provides a neat structure. For example, the Blondegasm BOMB Box Hair Treatment and Styling Kit for blondes and brondes can be presented as a thoughtful beauty gift. Its boxed kit format makes it a practical example for this wrapping style: simply add tissue paper, place the box inside a suitable gift bag or decorative outer box if needed, and finish with a ribbon and gift tag. You can explore the Blondegasm BOMB Box Hair Treatment and Styling Kit as inspiration for a beauty-themed present.
This approach is ideal when you want the gift to look polished without spending a long time wrapping it.
10. Add Handmade Decorations Using Paper Cutouts
Paper cutouts are an affordable way to personalize simple gift packaging. You can create flowers, stars, hearts, leaves, snowflakes, or other shapes using colored paper and scissors.
After wrapping your present, attach the cutouts to the surface using double-sided tape or a small amount of craft glue. You can arrange them in a pattern, create a decorative border, or use one large cutout as the main feature.
For a more creative finish, layer different paper shapes to add dimension. For example, several small paper flowers can create a decorative arrangement on a plain gift box.
This idea is easy to customize for different occasions. Choose romantic designs for anniversaries, cheerful shapes for birthdays, or seasonal decorations for holiday presents.
11. Try a Rustic Gift-Wrapping Style With Twine
If you prefer a simple and natural appearance, twine is an excellent alternative to traditional decorative ribbon. It pairs beautifully with kraft paper, recycled paper, and plain cardboard boxes.
Wrap your gift as usual, then wind twine around it several times. Tie the ends into a small knot or bow. For an additional decorative touch, attach a dried flower, small wooden ornament, or handwritten tag.
The combination of natural materials creates a relaxed, handmade appearance without requiring many supplies. It is also easy to recreate when preparing several gifts at once.
Rustic gift wrapping is a good choice for people who appreciate minimalist designs, handmade details, and simple packaging.
12. Make a Decorative Gift Bag From Paper
When you need to wrap an oddly shaped present, a homemade paper gift bag can be much easier than traditional wrapping. You can create one using thick wrapping paper, kraft paper, or large sheets of decorative paper.
Fold the paper into a rectangular shape, secure the side seam, and create a folded base so the bag can stand upright. Fold the top edge for a cleaner finish, then punch two holes near the opening and add ribbon or string handles.
Choose paper that is strong enough to support the gift. For heavier items, use thicker cardstock or place the homemade bag inside a sturdier reusable bag.
A handmade gift bag is useful for clothing, accessories, beauty products, and other items that are difficult to wrap neatly.
13. Use Washi Tape to Create Colorful Designs
Washi tape is an easy decorative material that can instantly transform plain wrapping paper. It comes in many colors, patterns, and widths, making it simple to create a design that suits the recipient or occasion.
Wrap your gift using plain paper, then use washi tape to create stripes, geometric patterns, borders, or decorative shapes. You can also use it to attach a handmade gift tag or create a simple bow-inspired design on the package.
One advantage of washi tape is that it is easy to work with and does not require complicated crafting techniques. Even a few carefully placed strips can make a plain package look more interesting.
For a coordinated appearance, choose two or three complementary tape designs rather than combining too many patterns.
14. Create a Layered Gift-Wrapping Look
Layering different materials is a simple way to make a present look more professionally styled. Instead of using only one type of wrapping paper, combine textures and decorative elements to create a package with more visual interest.
Start with a neutral base, such as kraft paper or plain white wrapping paper. Add a smaller strip of patterned paper around the center, then finish with ribbon or twine. You can also tuck a small decorative card underneath the ribbon.
The combination of different materials makes the package feel carefully designed without requiring expensive supplies. For example, kraft paper, a strip of floral paper, and a cream ribbon can create a soft and elegant finish.
The key is to keep the colors coordinated. Choose materials that complement one another so the finished package looks intentional rather than overly decorated.
15. Make a Personalized Gift Basket for a Special Occasion
A gift basket is a creative alternative when you want to present several smaller items together. It allows you to combine products that share a theme, such as a self-care collection, beauty gift set, coffee collection, or birthday treat package.
Choose a basket, decorative box, or reusable container that is large enough to hold all the items. Add tissue paper or shredded paper filler at the bottom, then arrange the gifts so that each item is visible. Place taller products toward the back and smaller items toward the front.
For a beauty-themed basket, you could include hair-care products, a brush, accessories, and a personalized note. A boxed hair treatment kit can serve as the main gift, while smaller additions make the overall presentation feel more complete.
Once everything is arranged, wrap the basket with clear cellophane if desired and finish it with a large ribbon. This creates a beautiful presentation without requiring you to wrap every item separately.
Tips for Making Your DIY Gift Wrapping Look More Expensive
Beautiful gift wrapping is not always about using expensive materials. Often, the difference comes from choosing a consistent color palette, keeping the wrapping neat, and paying attention to small details.
Start by selecting two or three colors that work well together. Neutral shades such as white, beige, brown, and cream can create an elegant appearance, while brighter colors can make birthday and holiday gifts feel cheerful. Avoid adding too many decorations because an overcrowded package can look less polished.
It is also important to measure your wrapping paper before cutting it. Using too much paper can create bulky corners, while using too little can leave parts of the gift exposed. Fold the edges neatly and use double-sided tape whenever possible to hide visible adhesive.
Finally, think about the recipient when choosing your decorations. A person who enjoys minimalist designs may appreciate simple paper and a beautiful ribbon, while someone who loves colorful crafts might prefer personalized patterns and handmade decorations.
Final Thoughts: Make Every Gift More Special With DIY Wrapping
DIY gift-wrapping ideas are a wonderful way to make presents feel more personal without spending a lot of money. From kraft paper and handmade bows to fabric wrapping, decorative gift boxes, and personalized baskets, there are countless ways to turn simple materials into beautiful packaging.
The best part is that you do not need to be an experienced crafter to create something impressive. A few carefully chosen materials, a little patience, and thoughtful details can make almost any present look special.
Whether you are wrapping a small birthday surprise, preparing a holiday gift, or creating a beauty-themed package for someone you love, the presentation can become part of the experience. Try one of these easy DIY gift-wrapping ideas at home and discover how a little creativity can make every gift even more memorable.