
Christmas is the perfect time to bring creativity into the kitchen, especially when it comes to preparing desserts for family gatherings, holiday celebrations, and Christmas parties. While cookies, cakes, and traditional holiday treats are always welcome, there is something extra special about homemade cupcakes decorated with festive designs. If you are looking for a dessert that is delicious, easy to personalize, and guaranteed to bring smiles to your guests, snowman cupcakes are a wonderful choice.
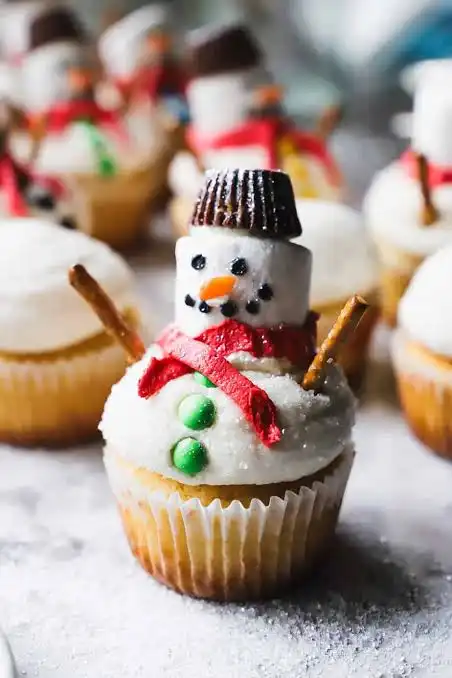
These adorable Christmas cupcakes combine soft, fluffy vanilla cake with creamy white buttercream frosting, marshmallows, chocolate decorations, and little orange noses inspired by the classic look of a snowman. Their charming appearance makes them especially appealing to children, while their sweet vanilla flavor makes them enjoyable for guests of all ages.
One of the best things about making snowman cupcakes is that you do not need professional baking skills or expensive decorating equipment. With a simple vanilla cupcake recipe and a few everyday decorating ingredients, you can create a beautiful batch of winter-inspired treats right in your own kitchen. They are also a fun baking project to share with children, allowing everyone to participate in preparing something special for Christmas.
Whether you are organizing a holiday dessert table, preparing treats for a school celebration, or looking for a creative homemade gift, these snowman cupcakes are a festive addition to the season. Here is how to make them from scratch, decorate them beautifully, and serve them at your next Christmas party.
Why Snowman Cupcakes Are Perfect for Christmas Parties
A Christmas dessert does not have to be complicated to make an impression. Sometimes, the most memorable treats are the ones that look cheerful, colorful, and thoughtfully prepared. Snowman cupcakes offer exactly that combination.
Their white frosting creates the appearance of freshly fallen snow, while marshmallows can be transformed into cute snowman faces. Small chocolate chips make perfect eyes and smiles, and orange candies or fondant can be shaped into little carrot noses. You can even add colorful scarves, chocolate buttons, or tiny candy hats to give each snowman its own personality.
These cupcakes are also convenient for parties because they come in individual servings. Guests can simply choose one without needing plates and knives to cut a larger cake. They are easy to arrange on serving trays, cupcake stands, or festive dessert tables.
Another advantage is their flexibility. You can prepare the vanilla cupcakes ahead of time and decorate them closer to the celebration. You can also involve children in the decorating process, making the preparation part of your Christmas activities rather than just another kitchen task.
Ingredients for Homemade Snowman Cupcakes
This recipe makes approximately 12 standard-sized cupcakes. The ingredients are simple and easy to find in most supermarkets, making it a practical choice for home bakers.
For the Vanilla Cupcakes
- 1 ½ cups all-purpose flour
- 1 ½ teaspoons baking powder
- ¼ teaspoon salt
- ½ cup unsalted butter, softened
- ¾ cup granulated sugar
- 2 large eggs, preferably at room temperature
- 2 teaspoons vanilla extract
- ½ cup milk
- 2 tablespoons vegetable oil
For the Vanilla Buttercream Frosting
- 1 cup unsalted butter, softened
- 3 cups powdered sugar, sifted
- 2 teaspoons vanilla extract
- 2 to 3 tablespoons milk
- A small pinch of salt
For the Snowman Decorations
- 12 large white marshmallows
- 24 mini chocolate chips for the eyes
- Additional mini chocolate chips for the smiles and buttons
- Orange candy decorations, orange fondant, or orange-colored icing for the noses
- Pretzel sticks for optional snowman arms
- Red, green, or blue fruit strips for optional scarves
- White or silver edible sprinkles
- Mini chocolate candies or small cookies for optional hats
These decorations can be adjusted depending on what is available. If you cannot find edible candy eyes or orange decorating pieces, melted chocolate and orange-colored icing work just as well.
Step 1: Prepare the Vanilla Cupcake Batter
Start by preheating your oven to 350°F (175°C). Prepare a standard 12-cup muffin pan by placing a paper cupcake liner inside each opening. This makes removing the cupcakes easier after baking and gives them a neat presentation.
In a medium-sized mixing bowl, combine the all-purpose flour, baking powder, and salt. Whisk the dry ingredients together until evenly mixed. Set the bowl aside while preparing the butter mixture.
In a separate large bowl, beat the softened butter and granulated sugar using an electric mixer. Continue mixing for approximately two to three minutes, or until the mixture becomes lighter in color and fluffy in texture. This step helps incorporate air into the batter, contributing to a softer cupcake.
Add the eggs one at a time, mixing well after each addition. Pour in the vanilla extract and vegetable oil, then mix until everything is combined.
Gradually add the dry ingredients, alternating with the milk. Begin with part of the flour mixture, followed by some milk, and continue until everything has been incorporated. Mix on low speed and avoid overmixing. The finished batter should look smooth and thick but still be easy to spoon into the cupcake liners.
Step 2: Bake the Cupcakes Until Light and Fluffy
Divide the batter evenly among the prepared cupcake liners, filling each approximately two-thirds full. Leaving enough space at the top allows the cupcakes to rise without overflowing.
Place the muffin pan in the center of the preheated oven and bake for approximately 18 to 22 minutes. Baking time may vary depending on your oven, so begin checking around the 18-minute mark.
To determine whether the cupcakes are ready, insert a toothpick into the center of one cupcake. If it comes out clean or with a few dry crumbs, the cupcakes are finished baking. If wet batter remains on the toothpick, allow them to bake for another two or three minutes before checking again.
Remove the pan from the oven and let the cupcakes cool for several minutes. Transfer them to a wire cooling rack and allow them to cool completely before decorating.
This step is especially important. Adding buttercream or marshmallows while the cupcakes are still warm can cause the frosting to soften or slide off. Give them enough time to reach room temperature so your snowman decorations stay in place.
Step 3: Make the Creamy White Buttercream Frosting
The frosting is what gives these cupcakes their beautiful snowy appearance. A smooth vanilla buttercream works perfectly because it is easy to spread, pipe, and shape into soft snow-like mounds.
Place the softened butter in a large mixing bowl and beat it using an electric mixer for approximately two minutes until creamy. Gradually add the powdered sugar, mixing on low speed to prevent it from spreading around your kitchen.
Once the sugar is incorporated, add the vanilla extract and a pinch of salt. Pour in the milk one tablespoon at a time while continuing to mix. Adjust the amount of milk depending on the consistency you want.
Beat the frosting for another two to three minutes until it becomes light, fluffy, and smooth. If the frosting feels too thick, add a little more milk. If it becomes too soft, gradually mix in additional powdered sugar.
For this particular design, you want a frosting that holds its shape without becoming difficult to spread. A slightly thick buttercream will help support the marshmallow snowman head and keep the decorations from sliding.
Step 4: Frost Each Cupcake to Create a Snowy Base
Once the cupcakes have completely cooled, it is time to create their snowy appearance.
You can use a small offset spatula, butter knife, or piping bag to apply the white buttercream. Spread a generous layer over the top of each cupcake, covering the surface completely. If you want a more decorative finish, use a large round piping tip to create a soft, rounded mound.
For an extra winter-inspired appearance, lightly sprinkle the frosting with white sparkling sugar or edible snowflake decorations. Desiccated coconut can also create a snowy texture, although it is optional.
Try to keep the frosting slightly rounded in the center because this will help make the snowman head look more natural when the marshmallow is added.
Step 5: Turn Marshmallows into Adorable Snowman Faces
This is the most enjoyable part of the recipe because the marshmallows will become the main feature of your Christmas cupcakes.
Take one large white marshmallow for each cupcake. Using melted chocolate, a small amount of black decorating icing, or an edible food marker, create two eyes near the upper part of the marshmallow. Add a few small dots underneath to form a cheerful smiling mouth.
For the nose, use a small piece of orange fondant shaped into a miniature carrot. You can also use orange candy decorations or carefully apply a small amount of orange-colored icing.
Allow any melted chocolate or soft decorations to set before placing the marshmallow onto the cupcake. This helps prevent the facial details from becoming smudged during assembly.
Once the snowman faces are ready, gently position one marshmallow on top of each frosted cupcake. Press lightly so it stays in place without flattening the frosting.
You can make each snowman slightly different. Some can have wide smiles, while others can have surprised expressions or little rosy cheeks made with food coloring. These small details make the finished cupcakes look more playful and personal.
Step 6: Add Festive Accessories and Christmas Details
Although the snowman faces already look adorable, a few additional decorations can make your cupcakes even more impressive.
For a classic winter look, add small pretzel pieces on either side of the marshmallow to create arms. Break the pretzels into shorter sections and gently position them so they resemble little tree branches.
You can also create colorful scarves using thin strips of fruit leather or fruit roll-ups. Wrap a small strip around the lower part of the marshmallow and gently press it into place. Red, green, and blue are especially attractive Christmas colors.
For snowman buttons, add three small chocolate chips vertically along the frosting beneath the marshmallow. If you prefer a sweeter decoration, use small round candies instead.
Mini cookies, chocolate candies, or pieces of chocolate can be used to create tiny hats. A little white frosting around the base of a hat can resemble a fluffy winter trim.
Finish each cupcake with a few edible snowflake sprinkles or a light dusting of powdered sugar. Avoid adding too many decorations, as the snowman face should remain the main attraction.
Tips for Making Your Snowman Cupcakes Look Beautiful
You do not need to make every cupcake look exactly the same. In fact, giving each snowman a slightly different expression or accessory can make the entire batch more charming. However, a few simple techniques can help create a more polished presentation.
First, make sure the cupcakes are completely cool before decorating. This is one of the most important steps for keeping the frosting stable. Second, use marshmallows that are similar in size so the snowmen look balanced when arranged together.
When adding chocolate details, use a toothpick or small piping bag for better control. This makes it easier to create neat eyes, smiles, and buttons without using too much chocolate.
If your frosting feels too soft, refrigerate it briefly before decorating. If the marshmallows are difficult to position, use a small amount of buttercream underneath as an edible adhesive.
Finally, arrange the finished cupcakes on a white serving tray or a Christmas-themed cupcake stand. Add a few decorative snowflakes, candy canes, or artificial pine branches around the display, keeping non-edible decorations separate from the food.
How to Prepare Snowman Cupcakes Ahead of Your Christmas Party
Preparing desserts ahead of time can make holiday entertaining much easier. Instead of rushing through every step on the day of your celebration, you can divide the preparation into smaller tasks.
The vanilla cupcakes can be baked one day ahead. Once they have cooled completely, store them in an airtight container at room temperature if the room is cool and the storage conditions are suitable. Avoid leaving them uncovered because they can dry out.
The buttercream can also be prepared ahead of time and stored in an airtight container in the refrigerator. Before using it, allow it to soften slightly and beat it again until smooth and fluffy.
For the best appearance, decorate the marshmallows and assemble the snowman cupcakes on the day of the party when possible. This helps keep the decorations neat and prevents the marshmallows from becoming too firm or sticky.
Because buttercream contains dairy, store decorated cupcakes in an airtight container in the refrigerator when they are not being served, following safe food-storage practices. Let them sit briefly at room temperature before serving for a softer frosting texture. Avoid leaving them out for extended periods in warm conditions.
Fun Christmas Activities to Enjoy While Baking with Kids
Snowman cupcakes are not only a delicious holiday dessert but also a wonderful opportunity to spend quality time with children. Kids can help measure ingredients with adult supervision, arrange cupcake liners, choose decorations, and create their own snowman expressions.
Younger children can enjoy simple decorating activities, such as placing chocolate chips for buttons or choosing the colors of the scarves. Adults should handle the oven, hot baking trays, and melted chocolate.
You can also make the experience more memorable by combining baking with a Christmas coloring activity. While the cupcakes are cooling, children can work on festive coloring pages featuring Christmas characters, holiday decorations, snowmen, and other seasonal designs.
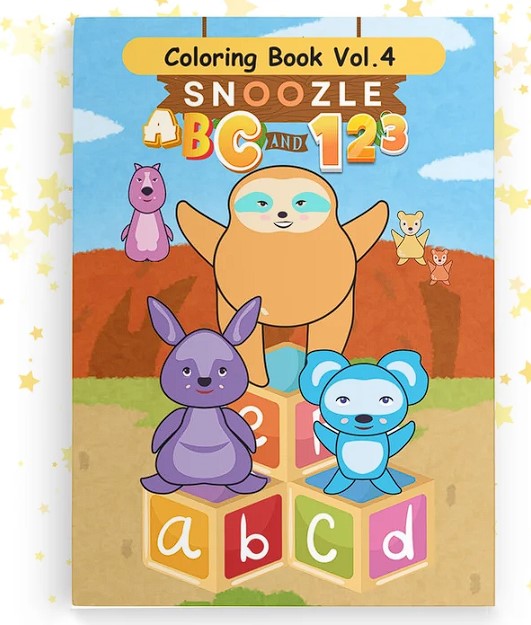
For an additional activity, consider the Snoozle ABC 123 Coloring Book, which can give children something creative to enjoy while the adults prepare the frosting and decorations. Combining baking and coloring is a simple way to turn an ordinary afternoon into a fun family holiday activity.
Creative Variations to Try for Your Christmas Cupcakes
Once you have mastered the basic snowman cupcake recipe, you can experiment with different flavors and decorations.
For chocolate lovers, replace part of the vanilla cupcake batter with cocoa powder or prepare a chocolate cupcake base. The contrast between the dark cake and bright white frosting creates a beautiful winter-inspired appearance.
You can also add a surprise filling. Before decorating, remove a small portion from the center of each cooled cupcake and fill it with chocolate spread, strawberry jam, or vanilla cream. Replace the small piece of cake before applying the frosting.
Another option is to create a melting snowman design. Instead of positioning the marshmallow upright, place it slightly sideways on a flattened layer of white frosting. Let some frosting spread around it to create the appearance of a snowman melting in the winter sun. Add chocolate eyes, an orange nose, and small candy buttons to complete the look.
For a more colorful dessert table, decorate some snowmen with red scarves, others with green earmuffs, and a few with chocolate hats. This creates variety while keeping the overall theme consistent.
Serving and Displaying Snowman Cupcakes at Your Christmas Party
Presentation can make homemade cupcakes look even more special. Arrange them on a tiered dessert stand to create height and make the snowman faces easy to see. If you are serving them alongside cookies, brownies, or other holiday treats, place the cupcakes in the center of the dessert table.
White serving plates, red cupcake liners, green decorations, and small Christmas ornaments can help create a festive display. You can also add a small sign with the name of the dessert to make the table feel more organized.
For children’s parties, consider placing the cupcakes in individual boxes so guests can take one home. Clear cupcake containers are especially useful because they protect the decorations while allowing everyone to see the finished snowman designs.
If you are preparing these cupcakes for a larger gathering, consider making a double batch. You can also prepare a combination of classic snowmen, melting snowmen, and snowmen with colorful accessories to give guests more variety.
Remember to consider food allergies when serving homemade treats. Clearly identify common allergens in your ingredients, including dairy, eggs, wheat, and any nuts or other allergens that may be present in your decorations.
A Sweet and Memorable Addition to Your Christmas Celebration
Homemade snowman cupcakes are a simple yet delightful way to bring Christmas cheer to your holiday celebrations. With their soft vanilla cake, creamy white frosting, marshmallow faces, chocolate details, and tiny orange carrot noses, these festive treats are as enjoyable to make as they are to eat.
The best part is that the recipe allows plenty of room for creativity. You can keep the decorations simple or add colorful scarves, chocolate hats, pretzel arms, and sparkling snowflake details to make each cupcake unique. They are perfect for family gatherings, school parties, holiday potlucks, and Christmas dessert tables.
More importantly, baking these cupcakes can become a meaningful holiday tradition. Invite your children or loved ones into the kitchen, prepare the ingredients together, and enjoy decorating each little snowman. Pair the activity with Christmas coloring pages and festive music to create an afternoon filled with creativity and family time.
This Christmas, skip the ordinary dessert presentation and bring something playful to the table. A batch of adorable snowman cupcakes is a delicious reminder that some of the best holiday memories are made through simple moments, homemade treats, and time spent together.